How to Install Aluminum Foil Ceiling Tile Effectively?
Installing Aluminum Foil Ceiling Tile can be an effective way to enhance interior aesthetics while improving acoustics. According to a report from the Building Industry Institute, the use of aluminum-based materials can reduce noise levels by up to 45%. This emphasizes the importance of proper installation for maximizing functionality.
Expert John Stevens, a leading voice in ceiling design, states, "The right installation techniques are crucial for achieving the desired results with Aluminum Foil Ceiling Tiles." This industry insight highlights the need for precision and awareness during the installation process.
Despite its advantages, many underestimate the complexities involved. Improper alignment can lead to gaps, affecting not only appearance but also functionality. Attention to detail is essential. Overall, understanding the installation process fosters better results with Aluminum Foil Ceiling Tiles, bridging aesthetics and efficiency in any space.

Understanding Aluminum Foil Ceiling Tiles: Benefits and Applications
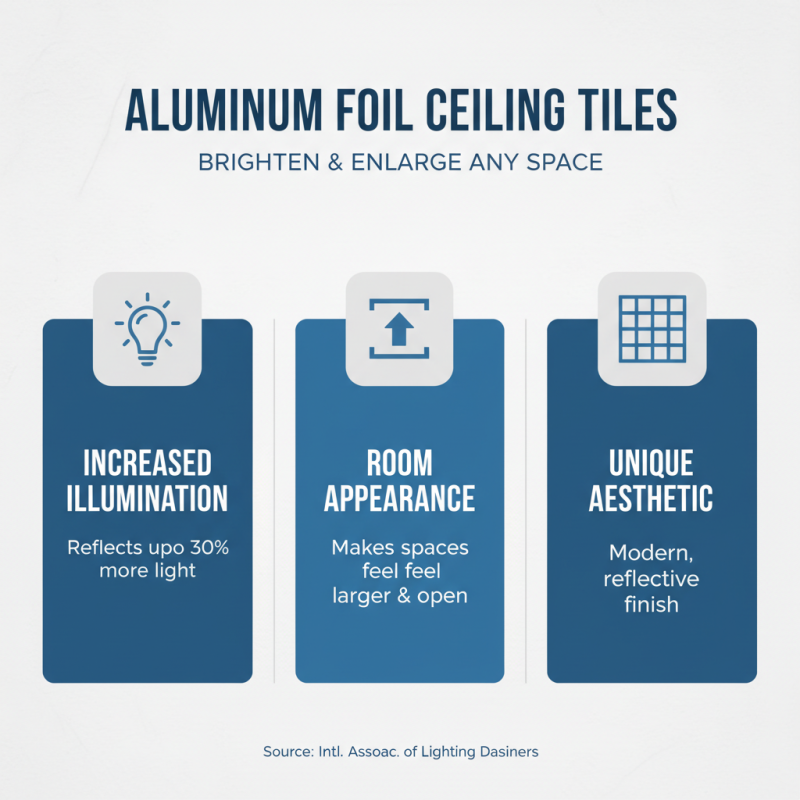
Aluminum foil ceiling tiles have gained popularity for their unique aesthetic appeal and functionality. They can reflect light, which enhances the brightness in a room. According to a report by the International Association of Lighting Designers, reflective surfaces can increase overall illumination by up to 30%. This makes them an excellent choice for spaces that need to appear larger and more inviting.
Moreover, aluminum foil tiles are resistant to moisture and can be used in high-humidity areas like kitchens and bathrooms. The National Association of Home Builders notes that moisture-resistant materials can prevent long-term damage and mold growth in homes. However, proper installation is crucial to maximize their benefits. Many people overlook this aspect, leading to less effective results.
One potential drawback is that these tiles may dent easily if not handled with care. If you're performing DIY installations, take your time. Rushing might lead to mistakes or damage. While they are easy to clean, some users find them difficult to find in various designs. This can limit your options when aiming for a specific decor style. Balancing aesthetics and practicality is essential to achieve the desired look.
Preparing Your Space: Tools and Materials Needed for Installation
When preparing to install aluminum foil ceiling tiles, having the right tools and materials is essential. This project typically requires a few basic tools: a utility knife, measuring tape, a straight edge, and adhesive suitable for ceiling tiles. Industry reports indicate that more than 70% of DIY installation failures come from not having the right tools handy. Therefore, ensure all equipment is within reach before beginning.
Materials are just as crucial. High-quality aluminum foil tiles are available in various finishes and sizes. An investment in these materials will enhance durability and appearance. Interestingly, a study by Home Improvement Research shows that well-installed ceiling tiles can improve insulation and reduce energy costs by up to 15%. However, realize that while many experts recommend adhesive for installation, not all adhesives work equally well with aluminum. Testing a small section first is wise to avoid potential issues.
Lighting plays a pivotal role in how the tiles look. Take into account your environment's lighting. Dark spaces may lead to less reflection and, ultimately, a disappointing result. Always be prepared for adjustments, as not all ceilings are perfectly level. Minor imperfections in the ceiling may require additional shimming or trimming. This project can feel overwhelming, but with the right approach, it can be completed successfully.
Step-by-Step Installation Process for Aluminum Foil Ceiling Tiles
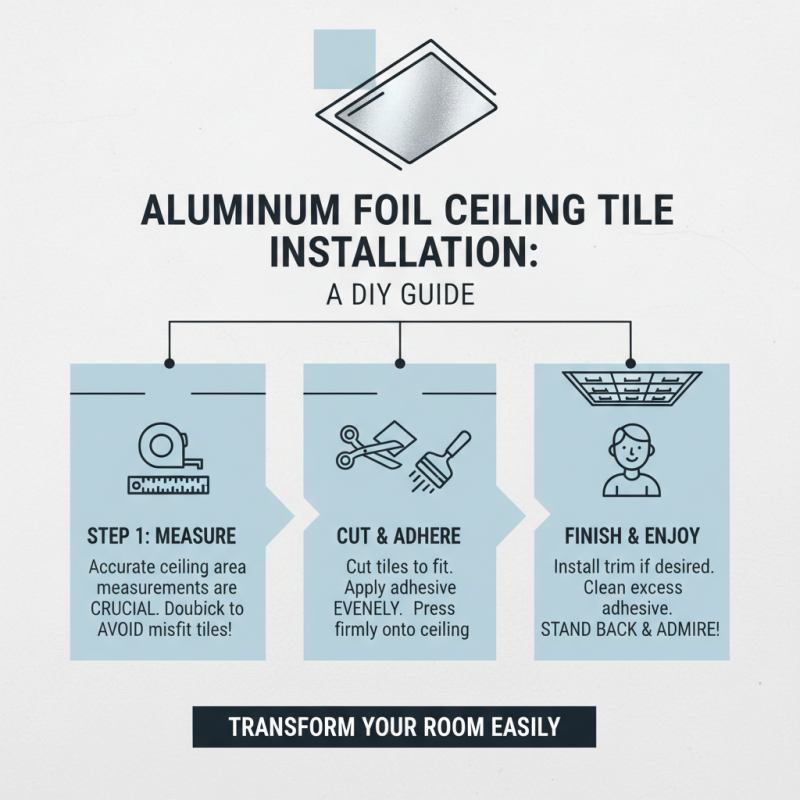
Installing aluminum foil ceiling tiles can transform a room. The process might seem daunting, but with a few simple steps, anyone can achieve a stunning result. Begin by measuring the ceiling area. Accurate measurements are crucial. This step can be tricky. If you make a mistake, you might end up with a tile that doesn’t fit.
Prepare the ceiling surface. Clean it thoroughly to ensure strong adhesion. Remove any old tiles or debris. Check for imperfections that require repair. Next, lay out the aluminum foil tiles on a flat surface. This allows you to visualize the pattern. Choose a design that complements your room.
When it’s time to install, use a good adhesive. Apply it evenly on the back of the tiles. Press firmly against the ceiling. It’s important to apply uniform pressure. You might find some tiles shifting during placement. If that happens, readjust quickly. Patience is key. Allow the tiles to set according to the adhesive instructions. This may vary, so pay attention. After installation, inspect for gaps. Some imperfections may catch your eye. Embrace them; they add character.
Common Mistakes to Avoid When Installing Ceiling Tiles
When installing aluminum foil ceiling tiles, many overlook common mistakes that can lead to unsatisfactory results. One major error is improper measurements. Accurate measurements are critical to ensuring a perfect fit. A report from the National Association of Home Builders indicates that nearly 30% of DIY projects fail due to measurement errors. Always double-check your dimensions before cutting tiles.
Another frequent pitfall is neglecting to prepare the surface before installation. A clean, smooth surface is essential for proper adhesion. Research shows that surfaces with dust or grease can reduce adhesive effectiveness by up to 50%. Many installers skip this step, thinking it's unnecessary. However, this can lead to tiles peeling over time.
Finally, not following the manufacturer’s guidelines is a common issue. Each tile may have specific requirements for installation. Failure to adhere to these can result in poor alignment and aesthetic flaws. In fact, an industry report from the Home Improvement Research Institute found that improper installation can decrease the longevity of ceiling tiles significantly. Always take the time to read and follow instructions carefully for the best outcome.
Common Mistakes to Avoid When Installing Aluminum Foil Ceiling Tiles
Maintenance Tips for Longevity of Aluminum Foil Ceiling Tiles
Maintaining aluminum foil ceiling tiles is crucial for their longevity. Regular cleaning helps keep them looking fresh. Use a soft, damp cloth to wipe away dust and dirt. Avoid harsh chemicals; they can damage the surface. Instead, mild soap with water works well. This keeps tiles shiny and prevents dullness.
Check for signs of wear over time. Look for scratches, dents, or discoloration. Small issues can often be fixed quickly. For instance, a gentle polish can bring back some shine. If tiles are heavily damaged, consider replacing them. Replacement can be a simpler process than attempted repairs.
Proper installation affects maintenance too. Ensure tiles are fitted well to prevent moisture build-up. Moisture can lead to mold, which is hard to remove. Make sure your installation space is dry and well-ventilated. This lowers the risk of long-term damage and keeps your ceiling tiles looking great.
How to Install Aluminum Foil Ceiling Tile Effectively? - Maintenance Tips for Longevity of Aluminum Foil Ceiling Tiles
| Installation Step |
Description |
Maintenance Tips |
Longevity Indicator |
| Prepare the Area |
Clear the ceiling area of any debris and dust. |
Regularly dusting the tiles every few months. |
Clean surface for better durability. |
| Measure and Cut Tiles |
Accurately measure dimensions; cut tiles to fit. |
Use a sharp utility knife to ensure clean cuts. |
Proper fitting minimizes wear. |
| Install Tiles |
Attach tiles using adhesive or clips, ensuring level installation. |
Check for secure attachment regularly. |
Stable installation extends tile life. |
| Add Finishing Touches |
Seal gaps with caulk for a finished look. |
Inspect seals for cracks and reseal as needed. |
Sealed edges help against moisture damage. |